Nectarine Coconut Teacakes

OK, yes, it is officially fall, but I can't get the fact that you can still find delicious and amazing stone fruit at the farmer's market. Case in point, Tenerelli Orchards who sells at the Wednesday Santa Monica Farmer's Market. They seriously have the BEST nectarines right now! I always feel so lucky to live in Santa Monica where I have access to the best fruits, veggies and organic local meat. It's really so hard to not spend all our grocery money in a matter of a couple hours. :) 

This week I knew I wanted to feature these gorgeous nectarines in a lovely teacake. And what better way than little mini tea cakes?! I baked these in a 12 cup standard muffin/cupcake pan and they came out perfect! I love the size and how it gave each piece a little crunchy crust but still was light and fluffy in the middle. Also using coconut shavings and cream made it the perfect amount of coconuty-ness ( I know that's not a word). Next up I'm going to try a vegan version of this since it already uses minimal eggs and butter. 

Couple of tips... 

- Splurge for really yummy delicious organic fruit. It really does make a difference in your final product. 
- Make sure to not slice your nectarine for the bottom of the pan too thin. Some of mine ended up sticking to the bottom of the pan which is a bummer since you want these beauties to end up on the teacakes!
- Do not skimp on buttering your pan!! Seriously. This is where you need to ensure they don't stick to your pan after turning out. 
- I really love making my own vanilla sugar and this adds a little extra finesse when you see the tops of your nectarines with little vanilla bean specs. I highly recommend using vanilla sugar vs. just plain sugar. 
- Make sure you use unsweetened coconut cream. It could be too much of a sugar overload if you don't. 
- You can easily double the recipe to make 24 teacakes. 

Nectarine Coconut Teacakes
Makes 1 Dozen Teacakes

Ingredients: 

  • 1/2 cup all purpose flour 
  • 1/4 cup whole wheat flour 
  • 3/4 teaspoon baking powder
  • 1/2 stick unsalted butter, softened (56 grams) 
  • 1/2 cup sugar 
  • pinch of salt 
  • 1 teaspoon orange zest (paige or navel) 
  • 1 large egg
  • 1/2 teaspoon vanilla 
  • 3/4 cup coconut cream, unsweetened 
  • 1/2 cup desiccated coconut, unsweetened 
  • 1 medium sized nectarine, sliced to be slightly thinner than 1/2 inch 
  • organic vanilla sugar or regular organic sugar (for the pan) 
  • 1-2 tablespoons of softened unsalted butter (for the pan)  

1. Preheat oven to 350 F. Take your 12-cup muffin/cupcake non-stick pan and butter each of the sections throughly. Make sure to get the sides and bottoms with a nice even coating. From there, take your vanilla sugar (or regular sugar) and sprinkle the bottoms of each section. You don't need to over do it. It's just a light sprinkling to give each cake some nice caramelization.

2. Slice up your nectarine and place a few small pieces on the bottom of each section. usually about 3-4 pieces. Set aside additional slices to add on top of the cake batter. Set aside pan until ready to fill with batter. 

3. In a medium bowl, add all purpose flour, whole wheat flour and baking soda. Whisk together to incorporate. 

4. In a stand mixer bowl, add butter, sugar, salt and orange zest. Using your paddle attachment on your mixer, cream butter, sugar and other ingredients together until it's light and fluffy. Should take about 3-4 minutes. 

5. Using a spatula, scrape down the edge of the bowl. With the mixer on, add the egg and beat until fully incorporated. 

6. Switch your mixer to low. Now, alternating between mixed flours and your coconut cream, add some of your dries and then add some coconut cream, repeat until both have been fully incorporated. Turn off your mixer immediately so you don't overmix. Remove bowl from mixer and add in your shredded coconut. Fold in by hand until just incorporated. 

7. Using a cupcake scooper, distribute the batter evenly in each of the sections of the pan. It should fill a little more than 1/2 way. Smooth out the tops of the batter with an offset spatula or spoon. Then add 1-2 slices of nectarines on each cake.  

8. Pop them into the oven and bake for about 20 -25 minutes. Rotate at least once after about 14 minutes. Cakes will be done when the tops are slightly springy and golden brown on the edges. You can also try the clean toothpick test but I noticed mine still needed a few minutes even though the toothpick came out clean. 

9. Allow teacakes to rest in the pan for about 4 minutes. Then turn the cakes out on a wire rack. If not all of them come out easily then run a thin pairing knife along the edges of the few that seem to be sticking. You can also turn them out very quickly and firmly on a cutting board. 

9. Cakes can last at room temp for 4 days but can last longer in the fridge or freezer. Enjoy cakes at room temp. 

 

Reggae Birthday!

What a fun cake to make for a past colleague who wanted to have a reggae themed party with all their loved ones! For this cake I decided to go all SMBC and only fondant/gumpaste toppers and accent as needed. 

C6416CBA-E980-4A40-A7DA-ED687E2BC64B.jpg

Seeing all the colors made it super festive and fun to work with. The original plan was to have a little teddy bear for the cake topper but then was asked to make it after their family dog Doris! I love love when clients are able to add their own requests for design since it helps me make it extra special for them. :) I was given some photos of her but then I pretty much used any and all photos I could find on IG to piece together the rest of the details. 

I also opted for no-fondant smash cake and used chocolate SMBC for the drum accents. First time piping lines with a wilton tip #3 and the key was not letting the tip/icing touch the cake. Pipe the icing out slightly off the cake and let it FALL on the cake. Still need a bit more practice but was happy with my first attempt. 

Here is the finished cake in all it's glory! Inside is a vanilla almond cake with fresh raspberry swiss meringue buttercream. Happy Birthday Asa!! 


Ode to the Air Jordan 3

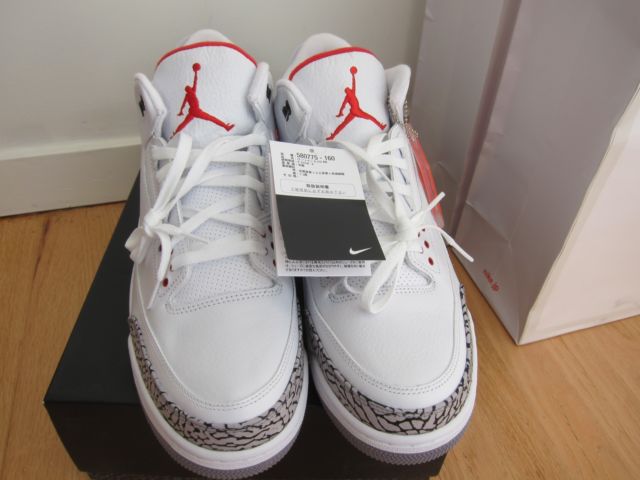
This week I was asked to create a cake for the ultimate basketball / sneakerhead guy. One of my past colleagues came to me and said she wanted a special birthday cake for her boyfriend, then sent me pics of his favorite pair of shoes.... the Nike Retro Jordan 3's! (This also happens to be Kelvin's favorite shoe too!)  

$_58-1.JPG

It's so fun to work with people to create delicious cake ideas that embody what they love!! She also mentioned that he loves basketball (just like Kelvin, haha) so from there I came up with this super clean, fun cake featuring he signature grey/black trim, a red jumpman and a mini basketball topper. 

Here are the original sketches for the cake when I wanted to make a little mini-guy but in the end we decided a more general b-ball theme would be best. Also decided on the second sketch to go with using the jumpman as the "T" which I thought was a fun way to incorporate him. 

IMG_0060 copy.jpg

Here is the final cake that I passed off for birthday celebrations! I'm pretty happy with it considering this was all just ingredients a day ago. Hehe. Happy Birthday Justin!  (Sorry Kelvin, this cake isn't for you.) 


New Kids on the Block Cake

I'm always excited for new challenges with cake commissions whenever I get a brief from someone. This time, it was New Kids on the Block!! I will say I was way more of a BSB fan since I was too young to appreciate NKOTB but it did prep me for the long teen years where I was a dedicated BSB and N'Sync fan. 

I remember I had a Jordan Knight doll cause I liked that he had black hair and could be matched up with my Barbies vs. having blonde Ken dolls. I was such a rebel at 5yrs old. (HA.) Of course we all sang along.... "Ooohh oh ohhh oh oh.. THE RIGHT STUFF!"

The most difficult part of this design was finding what outfits I can use to differentiate these guys and make it semi-apparent who each of them are. There's Jordan, Joey and Donny... the other two guys I can honestly say no one remembers them, right? They were the most difficult and I kinda just found some photos of them wearing similar-ish colors as these. :-/

This lovely NKOTB cake was chocolate with an OREO swiss meringue buttercream. So so so delish... and kinda like eating an Oreo Mc Flurry cream cake :D. 


Chocolate Hazelnut Strawberry Rosé Cake

In celebration of Valentine's / Galentine's / LOVE Day, I made a little sweetheart cake to bring more love into our lives. I don't know about you, but the news has been especially weighing on me and seems to just get heavier and heavier as the days go on. This year I'm not looking at February 14th as a romantic holiday to celebrate with my hubby. I see Feb 14th as a reminder to give more love to everyone on that day and every day. 

This recipe is a variation of that classic combo and playing with texture and other complementary flavors. I'm a pretty big fan of chocolate and strawberries as a combo if it isn't clear already. Haha. Promise I'll come up with more recipes that aren't chocolate and strawberry ;) 

This chocolate cake is much lighter than my other recipe and I love the addition of hazelnuts since it gives it a little crunch and the nuttiness goes nicely with the chocolate. As for the buttercream,  I added rosé wine to give it a little bite to the sweetness of the strawberry. I gotta say I'm definitely using this buttercream recipe for other desserts in the future! #roseallday 

I think a 6" cake is the perfect sweetheart sized cake for a small dinner party. I'm also not opposed to using a little fondant and sprinkles to add those finishing touches but they're definitely not crucial to a beautiful and delicious cake. I've included below if you're interested in learning how to make fondant hearts without a cutter. 

Color and roll out small balls of fondant. 

Using a scissor, cut a little slice 1/3 of the way through it. 

Using a shaping tool with the ball at the end of it, press on one side to flatten out and get the heart shape. 

This was a fun cake to make since I'm usually making cakes with 6 layers vs. 3 layers and soo much easier. Ahhh those even layers are also so calming for my OCD need for perfect layers and cake. The other new technique was to have the top of the cake a different color from the sides of the cake. 

The key to this look is to pipe and nearly finish smoothing out the top layer first. Then pipe and smooth out the sides of the cake. From there, as you smooth out the top edges, make sure to clean your spatula or flat surface after every swipe. 

Chocolate Hazelnut Cake + Strawberry Rosé Swiss Meringue Buttercream
Makes One 6" sweetheart love cake

Chocolate Hazelnut Cake: 

  • 1 cup roasted unsalted hazelnuts, finely ground 
  • 1 3/4 cup granulated sugar
  • 1 1/4 cup all-purpose flour
  • 1 cup cake flour
  • 1/2 cup unsweetened cocoa powder
  • 1 1/2 teaspoons baking powder
  • 1 1/2 teaspoons baking soda
  • 1 teaspoon kosher salt  
  • 2 large eggs, room temp 
  • 1 cup whole milk, room temp 
  • 1/2 cup canola oil 
  • 1/2 cup boiling water
  • 1 tablespoon vanilla extract 

Strawberry Rosé Swiss Meringue buttercream: 

  • 7 egg whites, room temp
  • pinch of cream of tartar or a couple drops of lemon juice 
  • 1 1/2 cup granulated sugar
  • 4 1/2 sticks butter 
  • 2 teaspoons vanilla extract 
  • pinch kosher salt 
  • 1/4 cup + 1-2 tablespoons fresh strawberry puree 
  • 3 to 5 tablespoons dry rosé 
  • 1/3 cup freeze dried strawberries (They sent good ones at Trader Joe's.) 
  • couple drops of food coloring 
  • sprinkles, fondant and any other decoration finishes 

MAKING CHOCOLATE CAKE: 

1. Preheat oven to 350 F. Grease 3 6" round cake pans and line with parchment paper. Set aside. 

2. If you didn't buy roasted hazelnuts then make sure to roast them yourself either in a pan (no oil) oven then let to come to room temp. Place roasted hazelnuts into a food processor and grind until they become small crumbs but not too much where they are a paste! Measure out ¼ of the hazelnuts and set aside. This can be used either on top of the cake or for other recipes. 

3. In a stand mixer bowl with the paddle attachment, add the processed hazelnuts, sugar, all-purpose flour, cake flour, cocoa powder, baking powder, baking soda and kosher salt. Mix until incorporated.

4. In a medium bowl, whisk together eggs, milk, vegetable oil, vanilla extract. (All but the water.) Then slowly incorporate the wet ingredients into the stand mixer bowl with the dry ingredients. Batter will be on the thicker side so this is where you stir in the boiling water. After incorporating it will be a very thin, wet batter. Total process shouldn't take long and make sure to not over-mix the ingredients. 

5. Divide the batter evenly into prepared pans. I use a kitchen scale and think it might be time for a new one!  Then tap the baking sheets against the table to remove the air pockets.

6. Bake for 15-20 minutes. Give the cake pans a turn halfway through the baking (after 8 minutes).  

7.  Let cake cool on a wire rack until ready to frost.

MAKING SWISS MERINGUE  BUTTERCREAM 

1. Cut/clean fresh strawberries and place them into a food processor to puree then set aside. Will only need 1/4 of the puree for one batch of buttercream. Add wine to the strawberries In a food processor blend the freeze dried strawberries to a fine powder and set aside. 

2. Add whisk attachment to stand mixer. Wipes down the electric bowl mixer with some lemon juice to ensure no fat/oil contamination. Add in egg whites and granulated sugar.

3. Create a double boiler with a medium pot filled 1/3 of the way with water. Ensure that the mixer bowl does not touch the water.

4. Add stand bowl with eggs & sugar and place over the boiling water with a medium heat. Lightly and constantly whisk the egg whites to avoid any eggs cooking. After 4 minutes or so, check temperature of eggs and ensure it reaches 160°F / 71°C.

4. Place bowl back on stand mixer and begin to mix on medium high for about 10 minutes. Will want your egg whites to be at a stiff peak. Check your bowl at 8 minutes and see how much more is needed. 

5. When bowl is cool to touch, remove whisk attachment and switched to the paddle attachment. Start adding in butter one tablespoon at a time and incorporate all the butter on the slow setting.

6. After butter is incorporated, add vanilla extract. Keep mixing until light, creamy and airy.

7. Set aside 2/3 of the batch in a bowl since that will be the buttercream used for the outside of the cake. The other 1/3 of the buttercream, add in 1/4 cup of strawberry puree, strawberry powder and 5 tablespoons of rosé.  Continue to mix in the stand mixer. Taste this as you go! If you need more strawberry, add more powder. If you need more rosé, then add another tablespoon. Careful not to over add on liquid. Always make sure you mix fully before adding more when you're tasing.  

8. Of the remaining 2/3 batch of buttercream, divide to two bowls again 1/3 in one bowl (light pink for top of the cake) and 2/3 in another bowl (darker pink for the sides of the cake).  

9. Apply light pink buttercream to the top of the cake and smooth out as you would normally do. THEN apply the darker pink buttercream on the sides. Carefully smooth out buttercream and when working on the edges of the cake on the top, wipe every time you swipe with your spatula/straight edge. 

10. Decorate with sprinkles and fondant hearts.